In this blog, I would try to demonstrate how to connect to Dynamics 365 CRM from a console application using Azure authentication. We will try to understand this in the following way:
1)
Will start
with .NET Code and update it with the required information at the end.
2)
Register an
application on Azure that will help us get connected to CRM.
3)
Create an Application
User in Dynamic CRM and assign a security role
Step 1) .NET Code
Note: Make sure your Target Framework is 4.6.2 or Above

Create a console application and add required Microsoft assemblies using
NuGet Package Manager.

Add Microsoft.CrmSdk.xrmTooling.CoreAssembly.

Note: Microsoft.CrmSdk.xrmTooling.CoreAssembly version should be 9.1.0.13 or higher in order to connect using ClientSceret

Now, copy the below code and you need to replace highlighted values
- Org URL,
- Application Client ID
- Client Secret Value
using System;
using System.Collections.Generic;
using System.Text;
using Microsoft.Xrm.Sdk;
using Microsoft.Xrm.Tooling.Connector;
namespace ConsoleAzure
{
class Program
{
static void Main(string[] args)
{
IOrganizationService orgService;
orgService
= Connect.GetOrganizationServiceClientSecret(
"3f9b1a74-f463-422d-a436-750a56ac169e",// Application Client ID
"q7E7Q~RRJ1EEcYwDqX7Z9IP0h58ZoEhGk3lPt",//Client Secret
"https://org1fe5ad12.crm8.dynamics.com/");// Application URL
Entity acc = new Entity("account");
acc["name"] = "dddd";
var createacc = orgService.
Create(acc);
Console.WriteLine("Account created!");
}
}
class Connect
{
public static IOrganizationService GetOrganizationServiceClientSecret(string clientId, string clientSecret, string organizationUri)
{
try
{
ServicePointManager.SecurityProtocol = SecurityProtocolType.Tls12 | SecurityProtocolType.Tls11 | SecurityProtocolType.Tls;
var conn = new CrmServiceClient($@"AuthType=ClientSecret;url={organizationUri};ClientId={clientId};ClientSecret={clientSecret}");
return conn.OrganizationWebProxyClient
!= null ?
conn.OrganizationWebProxyClient : (IOrganizationService)conn.OrganizationServiceProxy;
}
catch (Exception ex)
{
Console.WriteLine("Error while connecting to CRM " +
ex.Message);
Console.ReadKey();
return null;
}
}
}
}
Step 2) Register an application on Azure
Visit https://portal.azure.com/#home
Search for App Registration

Click on App Registration then click on New
registration.

Click
on New Registration and provide the below values.
Name: Console App,
Supported Account Type as Single Tenant.
Redirect URI as http://localhost
Now click on Register.

After registration note application (client) ID things. We need to update it in our code.

Next, we must provide API permission to APP.
Go to API Permissions option Click on Add Permission and in the list Select Dynamics CRM.


Next, We have to Grant Admin Consent for the permission. Click the Grant admin
consent and click Yes.

Next, we have to generate a Client Secret for the App. In the App click
on Certificates
& Secrets. Click on New client Secret.
Provide a name and choose Expires month and click Add.

We need to copy the Secret ID and value. Because the value cannot be copied
after some time.

Step 3) Application User in Dynamic CRM
We need to
now configure the Application User. Go to Advanced Settings and
Choose Security and
Select Users.
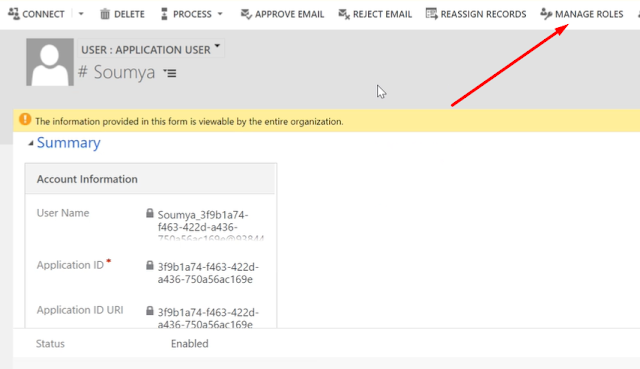
Change the View to Application
User and click on Add
new User.

Now provide the Client ID we have copied from Azure Active Directory in the Application ID field and save the record.


Now go up and visit STEP 1 and replace the following with the value you just obtain from STEP 2
- Org URL,
- Application Client ID
- Client Secret Value
Here are some other links for Troubleshooting and learning:
No comments:
Post a Comment